How To Make Coinhole Boards
At Coinhole™, we take pride in the detail and craftsmanship put into every board. Our master craftsmen work day in and day out to create beautiful, quality boards.
To learn just how we make our Coinhole™ boards, keep reading! We also have steps for how to make Coinhole™ boards that you can follow along with at home if you are hoping to create a DIY board.
Special Offer: If you want to paint your own Coinhole boards, but skip the workshop, scroll to the bottom of the page for an exclusive offer on unfinished Official Coinhole boards.
.
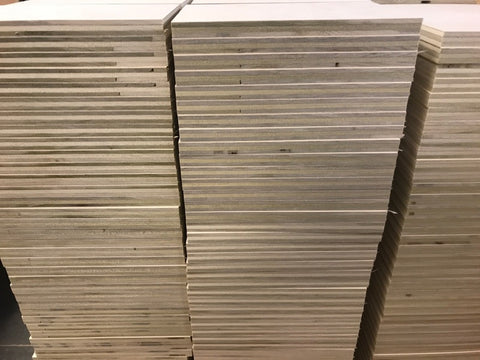
Step 1: We Get Our Hands On 100% Made In The USA Select Grade Maple
For step 1 of making Coinhole™ boards, we purchase our quality, made in the USA plywood. Our wood is never shipped from overseas. If you’re looking to make your own board, pay a visit to your local hardware store and use an economical Birch Plywood. However, do note that the select grade maple that goes into our Coinhole™ boards sands smoother and is more aesthetically pleasing than a lower quality board that you could find at big box home improvement store.
Step 2: Stock Up On Brad Nails, Glue, Sandpaper, Paint or Stain
At Coinhole™, we do things the old fashioned way, putting care and time into each board. So if you’re following along at home to make your own board, make sure you have the supplies above. Plus, you’ll need the proper tools.
Either buy, borrow or have a table saw, a router with a roundover router bit, a drill with a Forstner bit, a nail gun and a clamp. We recommend an air-powered palm sander, but you are welcome to hand sand as well. If you’re going to hand paint your board, don’t forget to pick up the paint and brushes you’ll need as well.
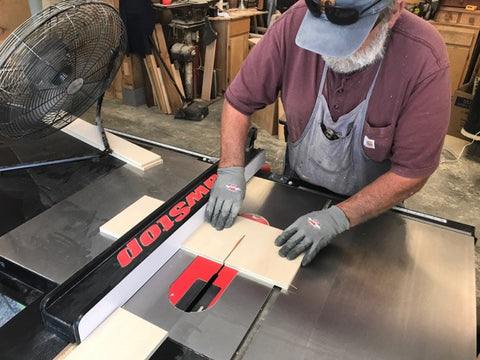
Step 3: Cut Out The Board
For step 3 of making Coinhole™ boards, we use a table saw to cut boards to Official Coinhole™ Board dimensions. To do this, set your saw and cut the wood to the board length. Reset your saw, and cut to the official Coinhole™ width.
Step 4: Cut Out The Board Legs & Attach To The Board
We use caution as cutting out the legs uses a very small cut. Be sure to use a push stick and any other guards or safety equipment that you have available. It’s very dangerous to use the saw to make this small of a cut! Now it’s time to apply the glue. Apply the glue and clamp the leg firmly to the board. Use your brad nails and nail gun to place 2-3 nails into each leg. If you’re following along at home, let the glue dry for 24 hours before working further with the board.

Step 5: Drill The Coinhole Hole!
Now it’s time to put the “hole” in Coinhole! Set up your drill. If you’re doing this at home, you’ll want to find a piece of scrap wood and clamp it to the table so you don’t accidentally drill into the metal table. Find the center of the board from the left and rind hand sides of the board and make a mark for each. Measure the Official Coinhole™ Hole Size. Slowly drill through it completely with your Forstner bit.

Step 6: Route The Board
First set up your table router and get your roundover bit ready. Gently and carefully route the board with the bit on all corners and edges. It’s very important not to have any tear out, so routing very gently is key. One false move with the router and your board will not be fit for play! Be sure to route the edges of the hole you just drilled in Step 5 with the Forstner bit as well.
Step 7: Sand The Board
At Coinhole, we use high quality air sanders with 320 grit sandpaper to sand each board to a silky smooth finish. We take our time to ensure each spot on the board is sanded. If you do not have an air sander at home, you can achieve the same effect by using 100 grit, 120 grit, 150 grit and 220 grit sandpaper. Sand the entire board with each grit, starting from the lowest grit and moving to the highest grit. This will ensure you have a uniform sand and a slick surface fit for playing Official Coinhole! It will also ensure that any polyurethane or paint applied goes on smooth without bubbling or unevenness.

Step 8: Finish The Board (Paint or Stain)
Vinyl
At this point in our workshop process, we use a high quality vinyl with a high quality print so that your Coinhole board images are crisp and clean looking. We finish the boards with a laminate to protect your board for play.
The boards are laminated with a high quality material that does not distort the image on the vinyl print. The finished product looks like a picture behind glass.
Important: On Official Coinhole products, we are able to offer your favorite colleges because of our Collegiate Licensing agreements. Due to copyright infringement laws, we are unable to offer any College or professional sports boards not currently on the website. CoinholeTM is a registered trademark of Martin’s Woodworking, LLC.
Stain
If you are creating your own board at home, and you would like to stain your board, first dust off the board. Then apply your choice of stain with a brush or rag. Let it dry for 24 hours. If you are not satisfied with the richness of the color, you can apply a second coat and let it dry for another 24 hours. Then, using a clean bush, apply one coat of a polyurethane gloss. Let dry for 24 hours. Then lightly hand sand the board for a few seconds and clean away the dust and apply a second coat. Let dry for 24 hours. If you’re not satisfied with the sheen of the gloss finish, you can repeat the process above.
Paint
Apply paint, using a primer. Let dry for 24 hours. Hand sand with highest grit available for smoothness. Repeat. Use an oil-based paint for the best Coinhole board finish.
Great! Now you know how to make Coinhole boards. Before you start on your own project, check out a cost comparison below.
DIY Itemized Cost:
$20 - for a half piece of Birch Plywood (or $40 for a whole sheet)
$2 - service cost for an associate to cut the plywood at the store
$4 - box of brad nails
$3 - wood glue
$4 - brushes
$6 - paint &/or stain
$5 - polyurethane gloss
Total DIY Cost: $44-$64
Total DIY Time: 3-4 Days
Total Coinhole Official Board Cost: $20
Total Time: Ships fast and free in 1-3 business days!
Paint Your Own Coinhole Boards
Order now and use promo code SHIPFREE and you can buy two unfinished Official Coinhole boards for $20. Then you can make these boards your own with your choice of paint or other finish!
Don’t forget to order our official Coinhole Coins for the ultimate playing experience!
Get a cost savings of up to $44 (vs. your DIY project)!